Adding Plausible to Carrd
Here's how to add Plausible Analytics to your Carrd site and set up the tracking of custom events such as button clicks.
Add privacy-first analytics to your Carrd site
How to add Plausible to your Carrd website
Get your site snippet
We display your snippet during the process of adding a new site to your account. You can also see the snippet within the Site Installation area of the General section in your site settings.
Go to your Carrd website editor
- Go to the editor of your Carrd website and add an Embed component.
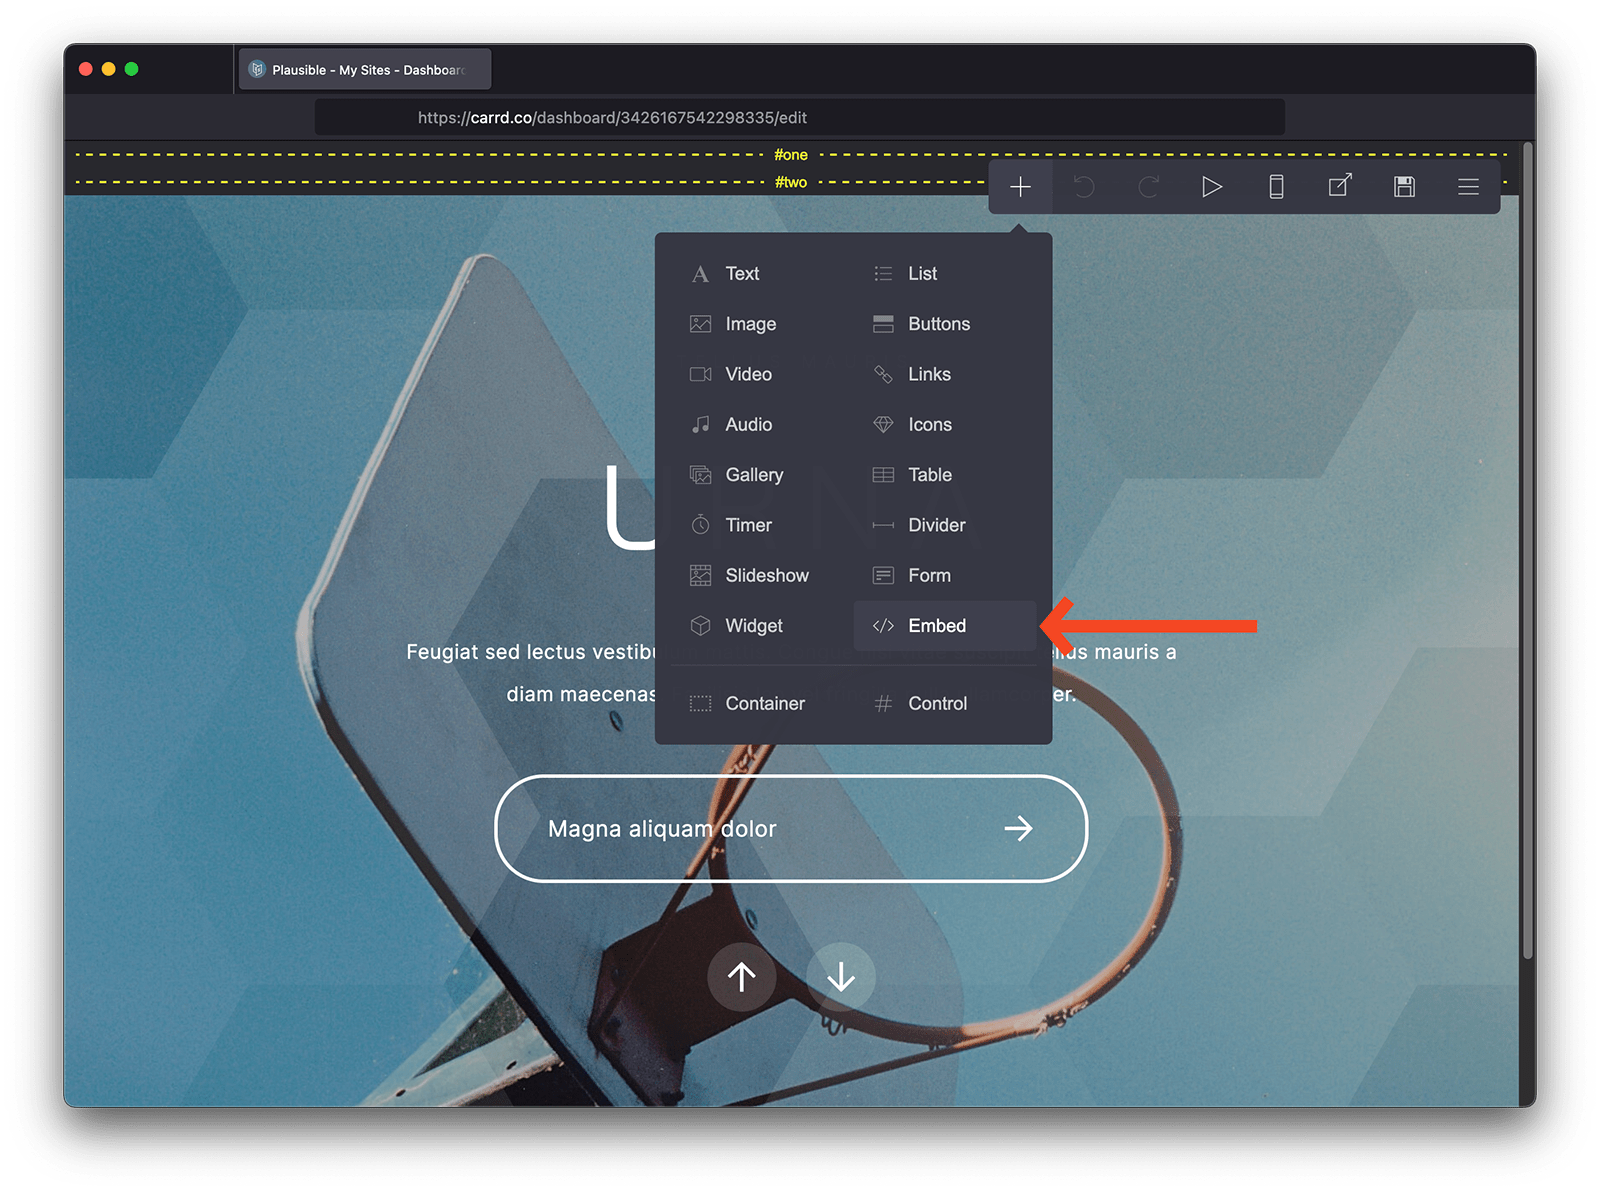
- In the element's settings make sure:
- Type is set to Code
- Style is set to Hidden and Head
-
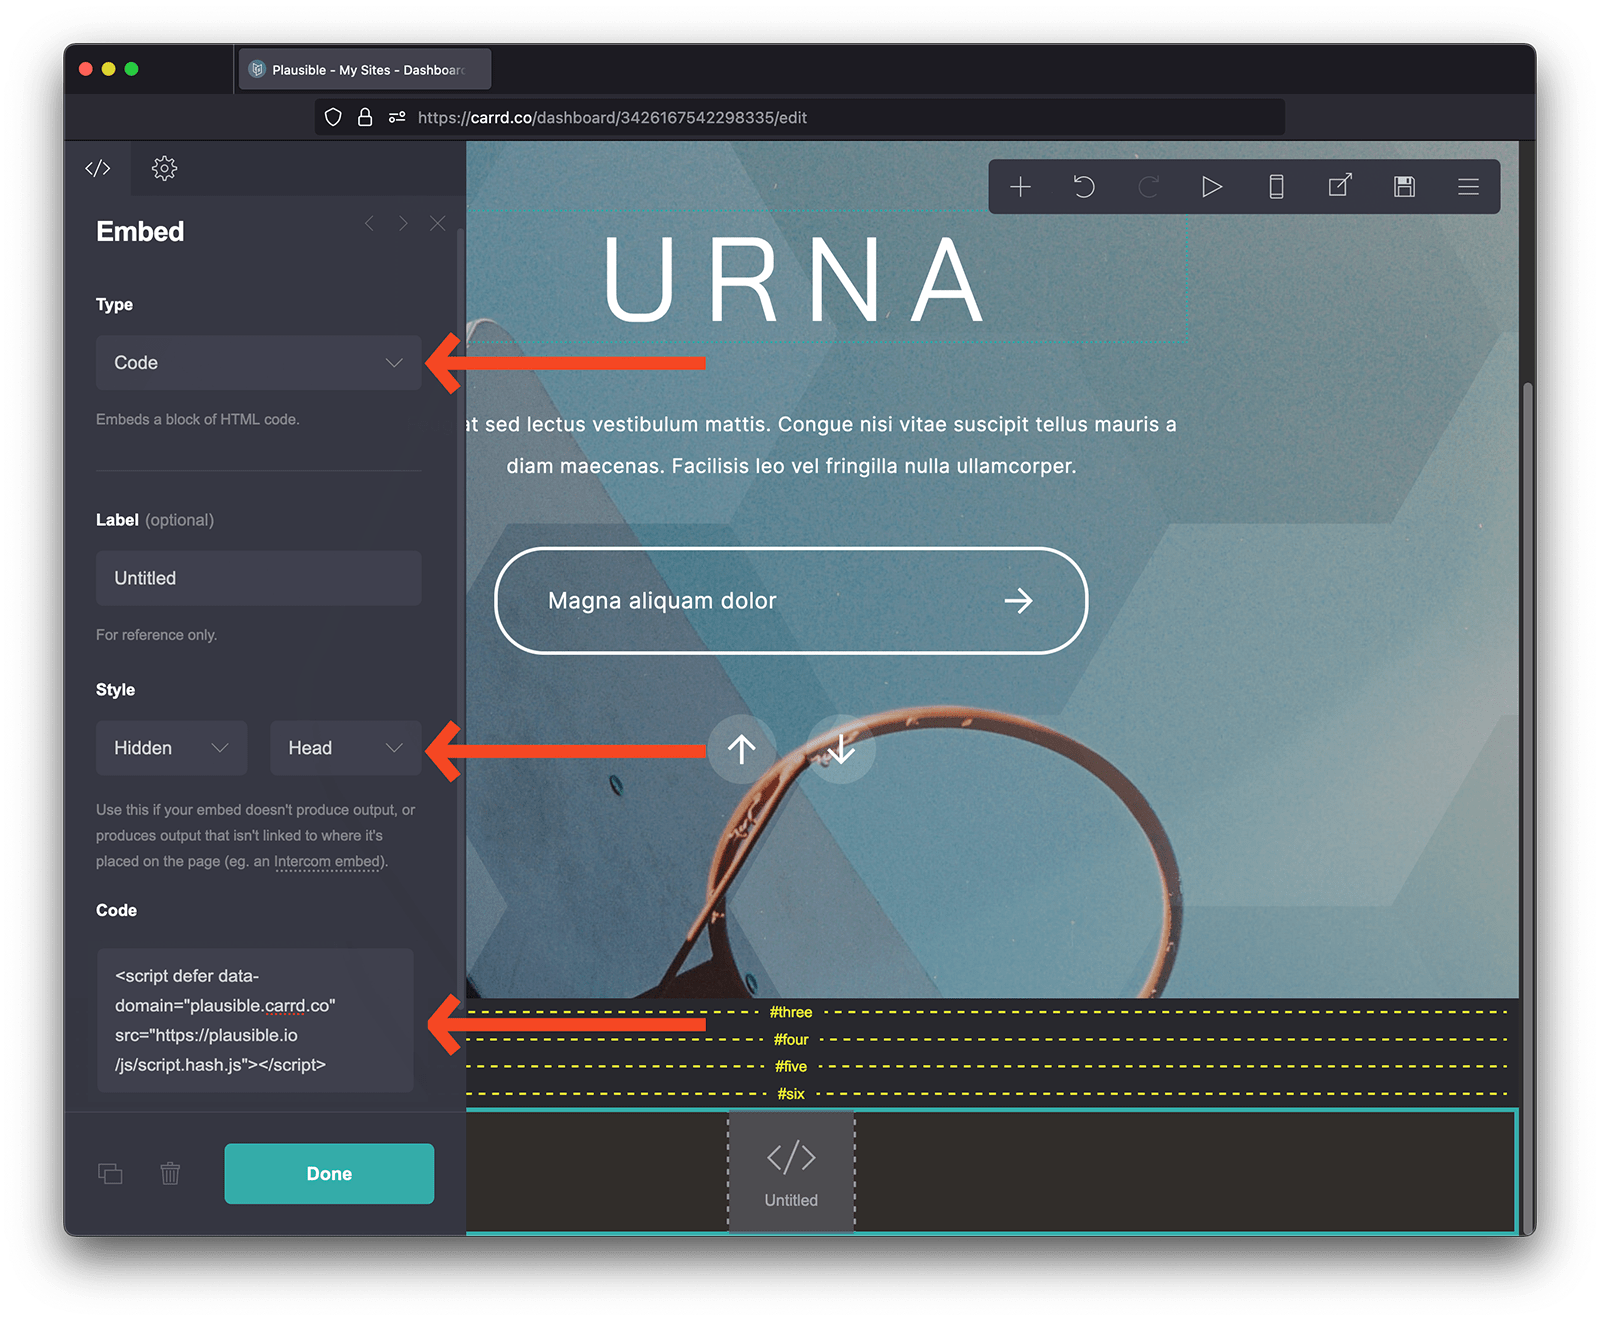
Then paste your Plausible tracking script in the Code field
-
In the snippet, update
plausible.init()toplausible.init({ hashBasedRouting: true }). This allows plausible to track hashed page paths that Carrd uses during navigation. -
Do click on the Done button and then Publish your changes. After you change the tracking snippet on your site, all the hash-based page paths on your Carrd website will start being tracked and will be displayed in the Top Pages tab of your Plausible Analytics dashboard.
Now you can go to your Carrd website and verify that Plausible script has been added and to your Plausible account to see whether the stats are being tracked. See here how to verify the integration.
How to track form submissions on your Carrd site
As an alternative to custom events, check out pageview goals. Since pageviews are collected automatically, you don’t need to change your website’s code to measure pageview goals. This makes pageview goals the easiest way to start tracking any type of conversions.
You can enable form submission tracking as an optional measurement when adding a new site to your Plausible account. If the site has already been added to your account, you can control how data is collected in the Site Installation area of the General section in your site settings.
Tracking button clicks and other links on your Carrd site
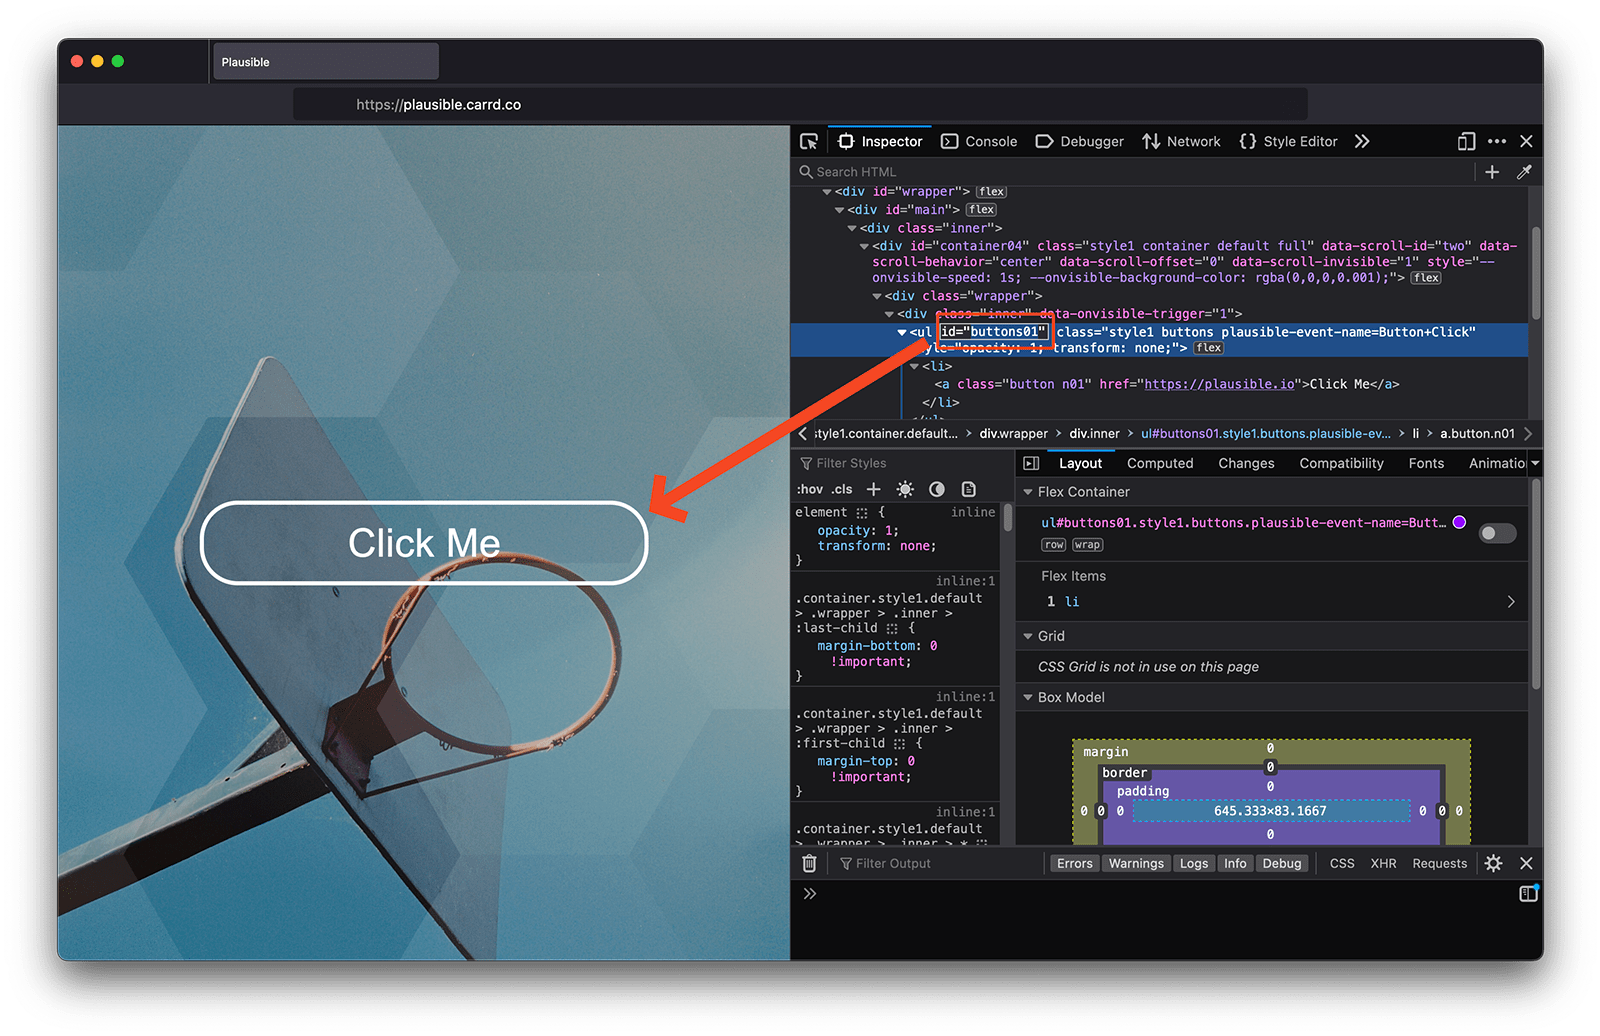
1. Set an ID to the element you want to track
In Carrd buttons and links have default IDs. Usually they're assigned IDs based on the order you've added them. So first button or link has an ID of buttons01/links01, second button or link has an ID of buttons02/links02 and so on and so forth.
If you're on a higher plan, like Pro Plus, you'll be able to set these IDs yourself from the element's settings.
To be sure of your element's ID, you can use your browser's dev tool to inspect the element.
2. Trigger custom events with JavaScript on your site
Here's the code you will need to insert in the <head> section of the page where the element ID that you want to track is located. You can use the Custom Code feature to do this similarly to how you've inserted the Plausible snippet into your site.
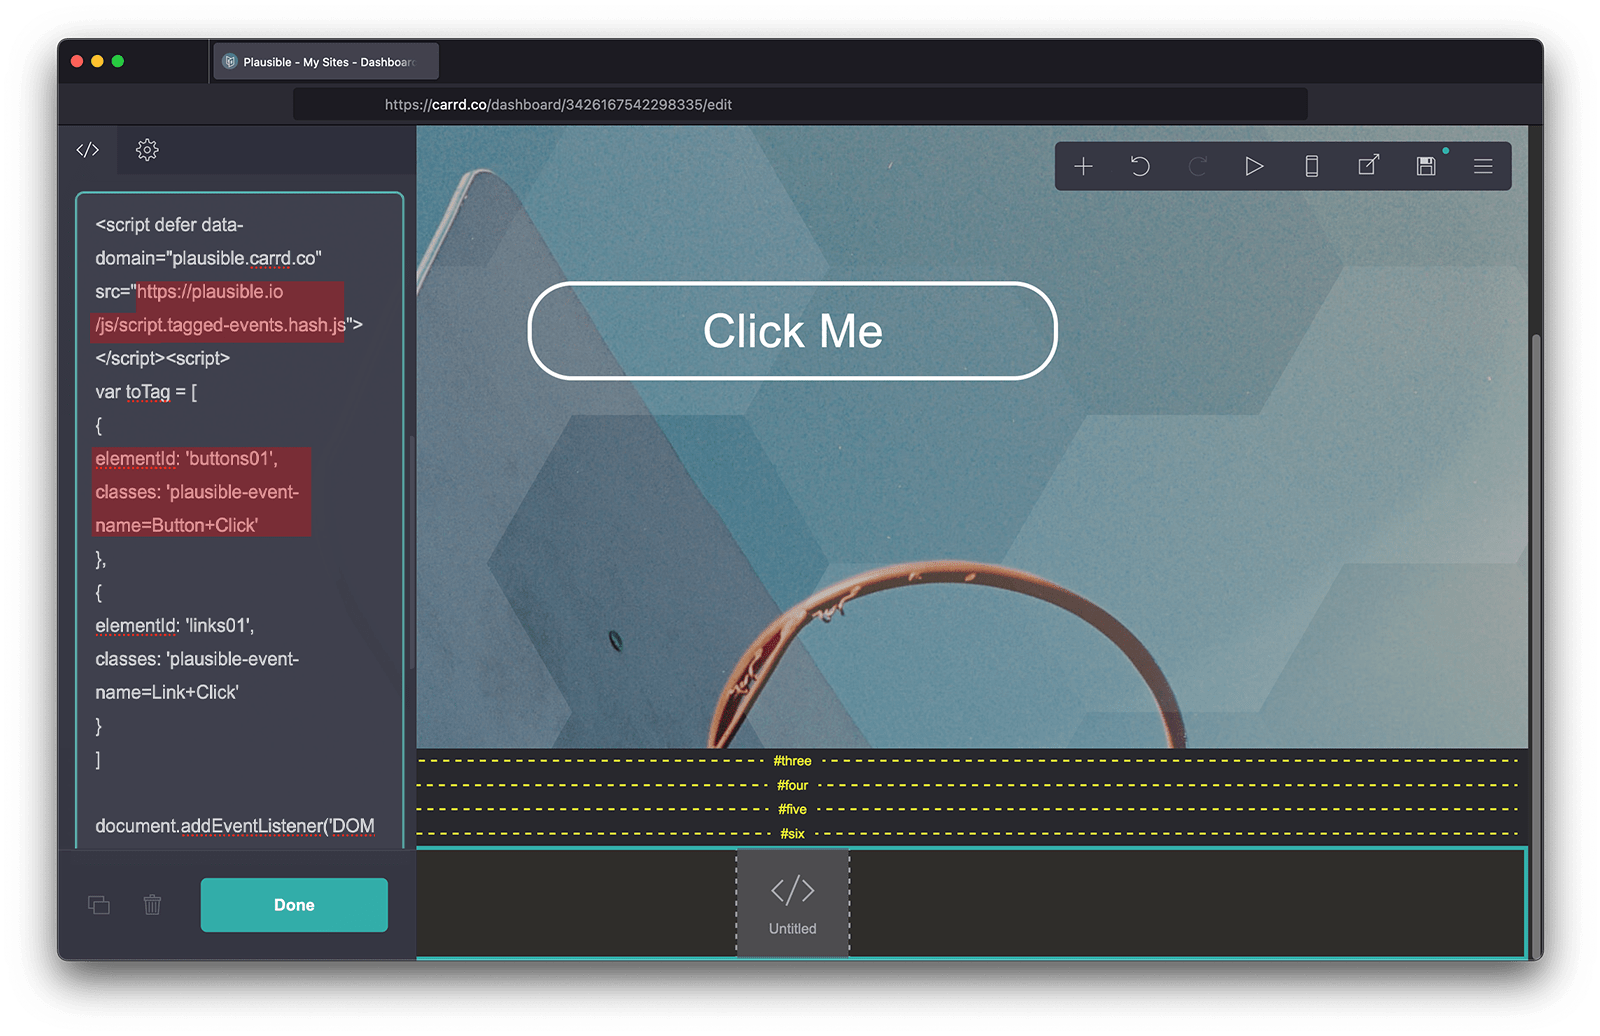
Make sure to change the elementId line in the code below to include the ID attribute of the element you want to track (buttons01 in our example).
Also do change the classes line to include the goal name in this format: plausible-event-name=Goal+Name. The goal name is completely up to you. It's the name under which the goal conversions will appear in your Plausible dashboard. We've used Button+Click goal name in our example.
<script>
    var toTag = [
        {
            elementId: 'buttons01',
            classes: 'plausible-event-name=Button+Click'
        }
    ]

    document.addEventListener('DOMContentLoaded', function (_e) {
        toTag.forEach(function (tagObject) {
            var element = document.getElementById(tagObject.elementId)
            tagObject.classes.split(' ').forEach(function (className) {
                if (element) { element.classList.add(className) }
            })
        })
    })
</script>
Do click on the Save Changes button and then Publish your changes.
3. Create a custom event goal in your Plausible account
When you send custom events to Plausible, they won't show up in your dashboard automatically. You'll have to configure the goal for the conversion numbers to show up.
To configure a goal, go to your website's settings in your Plausible account and visit the Goals section.
Click on the + Add goal button to go to the goal creation form. Select Custom event as the goal trigger and enter the name of the custom event you are triggering. The name must be an exact match to the one you added to your site for the conversions to show up in your dashboard.
So in our example where we added a goal name plausible-event-name=Button+Click to the Carrd site, the goal to add in the Plausible account is Button Click (plus is replaced by a space).
Next, click on the Add goal button and you'll be taken back to the Goals page.
4. Your goal should now be ready and tracking
Your goal should now be set up. When you navigate back to your Plausible Analytics dashboard, you should see the number of visitors who triggered the custom event. Goals are listed at the bottom of your dashboard. The goal will show up in your dashboard as soon as it has been completed at least once.
Triggering multiple custom events on the same page
If you want to trigger multiple custom events on the same site, you don't need to add the script for each element that you want to track. Simply add all the elements in the same code. Make sure to only add the elements that already exist on your site. For example, if you want to track a link and a button, the code will look like this:
<script>
    var toTag = [
		{
      		elementId: 'buttons01',
            classes: 'plausible-event-name=Button+Click'
   		},
		{
      		elementId: 'links01',
            classes: 'plausible-event-name=Link+Click'
   		}
    ]

    document.addEventListener('DOMContentLoaded', function (_e) {
        toTag.forEach(function (tagObject) {
            var element = document.getElementById(tagObject.elementId)
            tagObject.classes.split(' ').forEach(function (className) {
                if (element) { element.classList.add(className) }
            })
        })
    })
</script>

What's next?
- Create goals in your Plausible site settings to match the custom events you set up. They won't appear in your dashboard until you do
- Verify the integration is working to confirm events are firing correctly
- Filter your dashboard by goal to see which sources are driving the most conversions